Tuesday, December 11, 2012

Oil-Rubbed Bronze Outlet Covers!

I BOUGHT A HOUSE at the end of October!  Incidentally, that's about the same time I stopped blogging.  We've been busy cleaning, painting, replacing flooring, and packing to move - all DIY (mostly by my boyfriend and his dad) so it was pretty time consuming.  We're hoping to actually move this weekend!

I haven't done a lot of DIY projects myself yet, but I did buy four cans of oil-rubbed bronze spray paint with plans to repaint all of the shiny brass fixtures that came came with the house.  When we were taking down all of the outlet covers and light switch covers in prep to paint, we realized that they were all a little grimy and mismatched.  So I decided to spray those too - love how they turned out.  They make the house look much richer.

A quick "after" shot of my outlet covers.
I hope to share better pictures in the future!
A few tips if you're going to do this yourself:
- remove any dirt or grime, then lightly sand and wipe down with a cloth before spraying.
- spray sparingly!  Several light coats are better than one heavy coat.  I have a horrible relationship with spray paint and often end up overspraying.  This causes the paint to crackle - then you have to let it dry, resand, and start over.  Not fun.
- spray the screws too or they won't match.  I poked them all through a sheet of newspaper and gave them all a couple coats.
- I've never done this before, so no promises on how these hold up.  So far so good, but I haven't even lived in the house yet, so who knows.

My next DIY project is finding a way to use up the scraps remaining from our laminate floor installation.  I hope the next update comes in less than two months this time!

Friday, October 19, 2012

No-Sew Upcycled Denim Bracelet

This month's upcyclers' creativity challenge item was simple: "OLD PAIR OF JEANS!"

Interested in more info and my entries for other month's challenges?  Click away!
September 2012
August 2012
July 2012
June 2012
May 2012
 
Inspiration: This awesome book given to me by a dear friend - 99 ideas for upcycling jeans!  Amazing!  I pretty much picked the easiest one because I was feeling lazy, but I plan to try out many more in the future.
 
Here's the idea I picked.  I altered it a little.  They recommended cutting an empty water bottle to get your bracelet form.
 
I found a pair of old, raggedy, dirty, too-small jeans, and the cardboard center ring from a roll of tape that I had been conveniently saving for bracelet-making!
 
I superglued one end down with gel superglue and then started wrapping my denim strip around the cardboard ring.  I glued down the other end when I got to it.  You could also probably use hot glue.
 
It looked a little bland when I finished, so I cut some strips from this old t-shirt that I was originally planning to use for a scarf.  I glued and wrapped those too, and added a red button.
 
Done!  Chunky, fun bracelet.
 
I'm planning to wear it over sweaters this fall/winter.
 

Wrapping it up with a senior picture style pose.
I just love these challenges, not only because it forces me to think outside of my usual comfort zone, but because I get to see everyone else's awesome ideas too!  Check out Team Upcyclers and check out everyone's entries (which will be posted around the end of the month) on the Upcyclers Creative Challenge Board. 

Sunday, October 14, 2012

DIY Washer Necklace

This project isn't actually complete yet, but it appears to be in the pictures, so I'm going to share it now!  I found this pin about making a washer necklace.  Really cute.  I followed the instructions, using a mustard yellow nail polish that I got at the dollar store to paint the washers.  Then I connected all the washers with jump rings, in the same configuration as the tutorial.  Very proud of my work, I picked up the necklace to find all of the washers folding in on each other and flipping over to reveal the unpainted side.  I don't have a picture of the pinstrosity, but it was not cute.  So, I took it apart and connected the rings in a long row instead.  Not quite the look I was originally going for, but it still turned out to be a fun necklace:


After I wore it, I realized that the washers still tend to flip themselves over, so I'm going to have to take it apart again and paint the backs of the washers.  I hope I get to it soon because this was intended to be a fall necklace!

Friday, September 28, 2012

Stitch Fix: Box #2!

I shared briefly about my first Stitch Fix experience here.

Well, I decided that I could plan for one Stitch Fix per season, so here's what I got in my fall fix!

Even though I'm frowning in the picture, I actually loved this top.  It was very comfy and fit well, and I loved the colorblocking.  However, it was $88.  Way too much for me to spend on one top.  I'm hoping I can DIY something similar, using strategies similar to my t-shirt dress, perhaps.

The sleeves were way long, but I kind of liked the scrunched look.

The sweet necklace that came in my box.  I absolutely love it - so cute!

I decided to keep the necklace ($33) and have been wearing it often already!

Next up - this weird blouse for $70.  I wasn't sure about it at first.

It's a hi-lo style, so it's long in the back.  The longer I had it on, the more I liked it.  Not my typical style, but part of the point of Stitch Fix is to help you break out of your style shell!

I wore my next two items together - this bright blouse and blue cardigan.  I loved how they looked together.  The cardigan would've been a great piece for my wardrobe, but since it was $64, I figured I could get something similar much cheaper at a local store.

Here's the blouse by itself.  It was way too big and flowy untucked, but I'm not sure it looks great tucked in, either.  I'm still learning how to tuck in shirts properly without feeling like I'm in the 80s or 90s.

Here it is untucked.  Simply too big - I needed a smaller size.  So, although I loved the style and colors of the shirt, I did not buy it for $65.  Also, since this is my fall fix, I didn't really feel like investing in a springy blouse.
I belted the blouse later and liked it even more.  However, I still didn't think it was worth the investment.  It did open my eyes to this style that I wouldn't have tried before.
So, lesson learned: Stitch Fix may be too expensive for me.  This is where you can help!  If you click here (or any of my other Stitch Fix links), you will be using my referral ID to sign up and I will get a $25 credit!  (Then you'll get your own link to give out to family and friends so you can get your own credits.  Win/win!)

On the other hand, I have found one item in each of my fixes that I've been able to keep, so I may try it again this winter, even if I don't manage to collect any credit.  We'll see!  If nothing else, it's fun to try on expensive, stylish clothes that I wouldn't have picked out myself!

Sunday, September 16, 2012

DIY Women's T-Shirt Dress!

Here's the project I made for September's Upcyclers Creativity Challenge.  Check out my August post, which also includes links to all the previous challenges that I have participated in.  Here is the description of this month's challenge:  "for this month the medium will be a t shirt. You can use any and every part of the t shirt. Nothing is off limits here. :)  There are so many things you can do to upcycle a t shirt, and I can't wait to see what everyone comes up with!"  

Here are the shirts I gathered for my project:
Some old shirts of mine, a garage sale find, and a couple thrift store scores.
I combined two pins that I have been looking at for a long time to create my project.  I'm so happy I had an excuse to realize them!  The first was this one, an adorable upcycled little girls' t-shirt dress, that I wanted to make in an adult size.

from: http://www.iammommahearmeroar.net/

The next one was this one, a super cool and modern dress from Anthropologie.  It was originally priced at $268, yeah RIGHT, so I was convinced to find a way to DIY it.  (It's on sale for $69.95 now, which is a huge improvement, but still out of my budget.)  I can't figure out how to post the picture of that one, but click here to check it out.

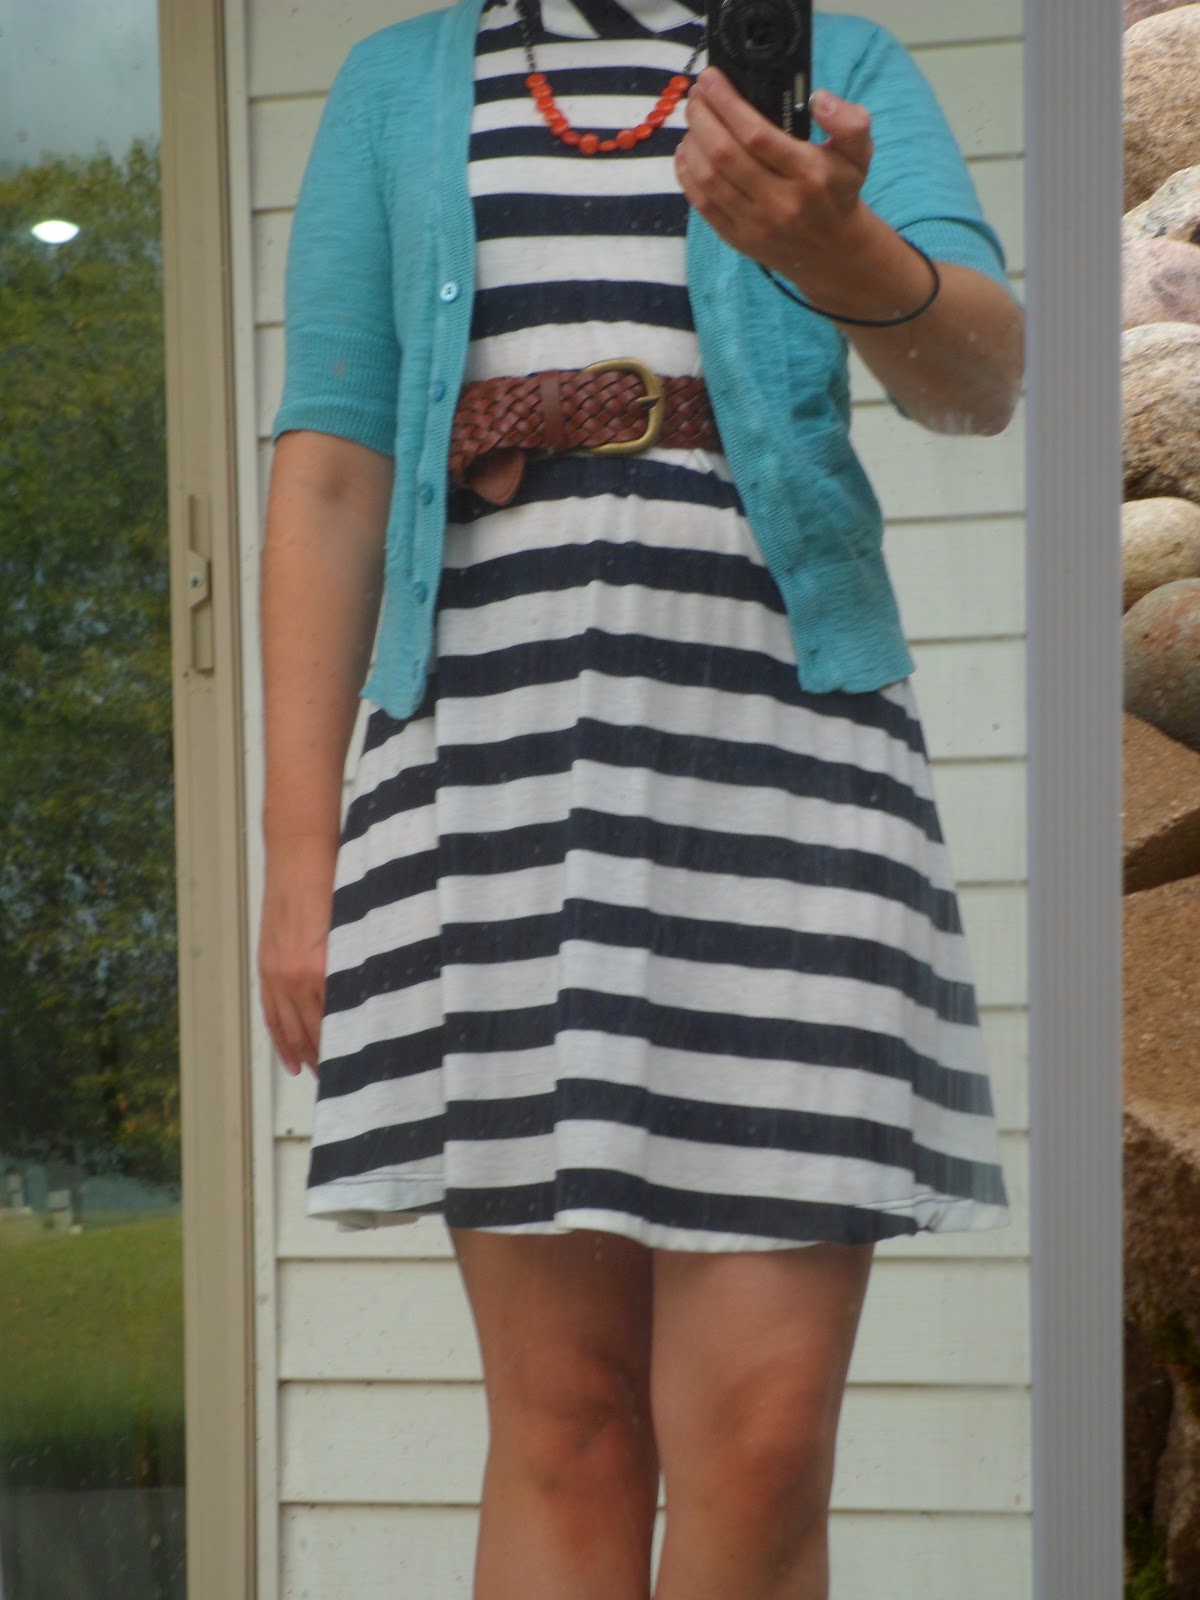
So, I wanted my dress to be a little more grown-up than the kiddie one, but I didn't have the right supplies to make it as uniform as the anthro one.  I basically used the tutorial for the kid dress, so follow that one if you want to make something similar.  I kept my seams on the inside though, to make it look a little more finished.  I started off with an tee of mine that had a polo style top that fit well, but it was kinda tight in the belly area, so I didn't wear it often.  I cut it just below the buttons.  Then I cut some wider strips in colors that went together from a few other old t-shirts.  I used another dress I had as a guide for the width and length (don't forget seam allowances - I almost forgot).  I wanted some with some unique designs on them, to look a bit like the screenprinting on the anthro dress.  I sewed the strips together (first a panel for the front, then one for the back, then sewed up the sides.  Finally, I attached it to my cut-off top shirt.  Here's the result:

Comfy and fun t-shirt dress!
Cost: about $3!

Keeping it cozy with a white hoodie.

Dressing it up for fall with a black cardigan and boots.
 The back of the dress is just other parts cut from the same shirts, but without the screenprinting.  To be honest, I almost like the plain colorblocking (without the printing) better and if I even make another dress, I'll probably just use plain colored t-shirts.  Overall, I'm very happy with it and looking forward to wearing it often!

Check out Team Upcyclers and check out everyone's entries (which will be posted around the end of the month) on the Upcyclers Creative Challenge Board.

Thursday, September 13, 2012

Challenge!

I recently decided to participate in a challenge by Tricia at Upcycled Stuff.  The challenge combined upcycling and sewing (in honor of sewing month, with is apparently this month!).  You can read a summary of the challenge here, but it basically involved Tricia sending out packets of "garbage" to the participants, who in turn had to create something out of the contents.  And it had to involve sewing.

My packet contained a comic book, some Target bags, and some aluminum flowers!  Yikes!  I made a super fun garland out of my items - Tricia did a write-up here - please check it out!  Also, feel free to follow her blog to see everyone else's entries within the next few weeks.

Here are a couple pictures:

Garland close-up.

Happy fun colorful garland!

Tuesday, September 11, 2012

Fun Fashion Finds! (part 2 of 2)

I am finally getting to completing my fashion finds post that I started here.  This time I took pictures outside with my full-length mirror in hopes of some better quality shots, though I'm not sure they're much better than the first post.  Anyway, here are the rest of my finds!

This outfit represents my most recent finds!  I snagged these capris on clearance at vanity.  I think they are always supposed to be rolled up, but when they are rolled down, they come right to my ankles, so I definitely plan on wearing them with flats this fall and boots this winter.  The jacket was a Gordman's find and an investment piece for this winter.  It looks classy but is super comfy because it is made of sweatshirt material.  The t-shirt was a thrift-store find from earlier in the summer and the shoes were on clearance at K-mart last fall.

Dressing it down with some comfy shoes from DSW.

I found this dress on clearance at Forever 21.  It was $15, but they were having a buy one get one free sale, so really it was like it was $7.50.  I paired it with the coral shrug and sandals from my first post.  I also got this belt from Forever 21.

Dressing it up with heels that I got on clearance at Target about five years ago.  (p.s. I'm only five feet tall, and I think this dress is kinda short on me.  Forever 21 probably isn't the place you want to shop if you're tall or even average-sized.  Unless you like your dresses really, really short.)

The other half of my BOGO Forever 21 deal.  It was on sale for $10, so it was really like getting it for $5.  I used the same belt and a Target cardigan from a few years ago.  And some clearance sandals from Gordman's.

Close up - I made this orange necklace - super easy and I love the pop of color it adds.

Back in the capris and sandals with another thrift top that I got for a dollar.  It was originally from the Gap and I plan to wear it under cardigans and jackets this winter.

My last fashion find!  Another $1 top from the thrift store!  I'm loving the polka dots and have been wearing this like crazy.  It is from Heritage 81 and I'm not sure what store carries that brand - Forever 21 again?  H&M?  Not really sure, but I love the top.  However, it either shrunk or is also made for a short person.  I couldn't wear it if it was much shorter.
The end!  I'm not sure if I'll be writing about fashion anytime soon because I need to keep my clothes budget in check.  Well, except that I have another StitchFix coming soon, so I'll try to write about that at some point.  And, I have a clothing item planned for my next Upcyclers Creativity Challenge, so more fun clothes are on the way!  Yippee!

Wednesday, August 29, 2012

DIY Baby Boy Gift!

As promised, I'm here to write about the gift I made for my dear friend who is having a baby boy this October.  The first part of the gift was a tie onesie!  This is definitely not my original idea - just google "tie onesie tutorial" and you'll find tons of instructions.  I didn't use a tutorial because my boyfriend's mom taught me how to make them.  I just picked up some plain white onesies in different sizes and some fabric with cute-looking designs.  Note: I bought 1/4 yard of each color and that was WAY too much.  All you really need are a couple scraps.  Don't be silly like me and buy new.  If you don't have any scraps, I'm sure you can find some cute, inexpensive pieces at your local thrift store!  That's my plan for next time.  Anyway, here are the finished onesies (please don't judge my sewing ability; it's not my forte):


Plaid tie (ignore the distracting background).
Close-up of the plaid tie.

Striped tie.

Different placement of the stripes.

Close-up of the stripes.
I got a basket to pack them in - but had to get a few more supplies first.


I stopped at Target and got a few burp clothes that my friend had on her registry.  I also brought some tissue paper from home, and picked up a few fake flowers.  I rolled each of the items into a tight roll and taped them closed.  Here's what it looked like after everything was arranged in the basket, modeled after a gift basket I saw for sale but figured I could make myself:
A baby boy flower basket!

Another view.

Close-up of of the "flowers."
This gift was a hit at the baby shower!  And it was fun to make - I loved combining something handmade plus something off of her registry into a pretty gift basket!


Friday, August 24, 2012

Upcyclers Creativity Challenge: August!

Here I am with my submission for the August Upcyclers Creativity Challenge!  You can read more about the challenge in my previous posts:  here, here, and here.  I also have a previous challenge item listed in my shop here.  Here's the description of this month's challenge:  "Whether you're male or female, you probably use a handful/a ton of grooming products every day. They all come in colorful bottles, glossy boxes, plastic cases and other enticing outer shells that beckon from the shelves. And they all end up in the trash because most are not compostable.  So: Let's make something beautiful from what helps make us beautiful! A vanity reciprocity!"

My creation is pretty basic, but it's going to be super functional for me!  I forgot to take many process pictures, but here's what I have:

A hairspray bottle, a conditioner bottle, and a pill bottle.
I removed the writing from them using this pin as a guide.  (The hairspray one also needed to be sanded to remove all of the writing.)  Then I cut off the tops and sanded them smooth.

Major mishap with the pretty blue one.
 The blue one got recycled instead of upcycled.  :(  And if you look closely at the picture, you'll see that I own a pretty blue car that matched the bottle.  One of my favorite colors.  Anyway, I don't have any more in-progress pictures, so the next ones are the finished products!  I also found a light blue cover from a hairspray bottle that didn't need to be cut and didn't have any writing on it.  And the biggest surprise find was a tiny travel shampoo bottle that I discovered in the garbage after a friend had been visiting from out of town.  You better believe that I dug that baby out of the garbage (and cleaned it), peeled off the stickers, and cut a slit in the side.  Ready for the finished product?  Here it is:

All the items screwed down to a heart-shaped piece of wood that I painted.

From the side...

...and from the front.
 Still not sure what it is??

It's a packing/shipping station!!

It holds business cards, note cards, tape, scissors, pens, markers, and pencils.

Simple, sweet, and oh so handy!!
 I anticipate using my shipping station all. the. time.  I normally have these items strewn about my workspace or am digging in the closet to find them.  I'm so pleased to have them all in one place.  Pretty please check out Team Upcyclers and check out everyone's entries (to be posted within a few days) on the Upcyclers Creative Challenge Board.